
Automated checks This plan went on the timetable after its content and sources passed the studio's automated checks on Wednesday 11 November 2026. Before you start
Running order
Set 1 of 6
Warm up with pelvic position and breath
- 01
- This class focuses on checking your position through hand placement, mat contact and the movement you can feel, with a standing finish against a wall. Begin by exploring your resting position before adding arm, leg and spinal movement.
- 02
- Lie on your back with your knees bent and your feet resting flat. Arrange your legs parallel to each other, following a line from each hip through the knee, heel and toes.
- 03
- Let your shoulders settle as you notice your neck and jaw. Allow your lower ribs to rest toward the mat, leaving your arms easy beside you while you explore the position of your trunk.
- 04
- Place your hands on your pelvis and notice how it rests beneath your palms. Keep that contact while you begin moving the pelvis, so that you can follow its direction through your hands.
- 05
- Tuck your pelvis gently and feel your lower back approach the mat. Keep your shoulders, neck and legs relaxed during the tuck, with your attention on the changing contact beneath your waist.
- 06
- Tip the pelvis in the opposite direction and notice your lower back moving away from the mat. Let your hands follow that change without asking your shoulders or legs to join the movement.
- 07
- Settle between the tucked and tilted positions, leaving a small natural space beneath your lower back. Slide a hand beneath your lower back to feel the space left by this position, then return your hand to your pelvis.
- 08
- Picture a cup of water resting on your lower abdomen. Arrange the pelvis as though you were keeping the cup level, with neither a forward tip nor a tuck underneath.
- 09
- Place a hand at each side of your waist, between the lowest rib and the top of the hip. Compare the space at the sides while you are still, then notice how that comparison changes if you adjust your position.
- 10
- For Rib Cage Breathing, place your hands around the sides of your ribs. Let the ribs settle toward the mat before following their movement with your palms.
- 11
- Inhale and feel the sides of your rib cage widen into the heels of your hands. Attend to the outward movement beneath your palms while allowing your abdomen to move with the breath.
- 12
- Exhale and follow the ribs as they draw inward. Near the end of the breath, add the abdominal scoop by drawing the abdomen inward and upward while keeping the pelvic position you established.
Set 2 of 6
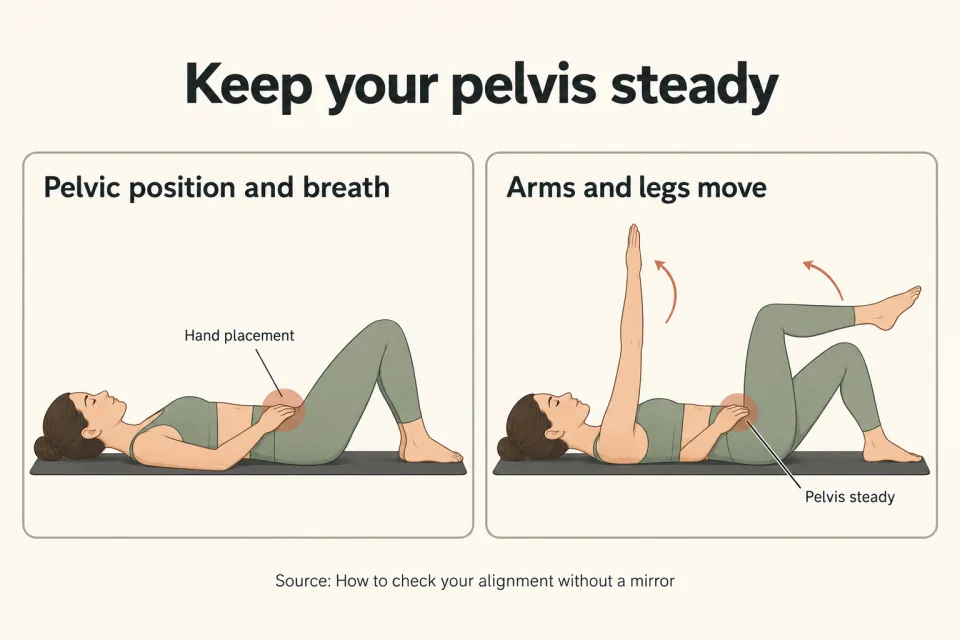
Keep your pelvis steady as arms and legs move
- 13
- Begin Rib Cage Arms with your feet on the mat and your arms resting beside you. Keep the neutral pelvic position from the warm-up as the arms begin their journey overhead.
- 14
- Breathe in through your nose while moving your arms toward your ears. Reach through your fingers and notice the contact beneath your ribs as the arms travel, keeping the ribs settled while drawing the abdomen upward.
- 15
- Let the reach finish around the level of your ears. Use that position as the end of the movement without making contact with the floor overhead a requirement for completing it.
- 16
- If your ribs lift away from the mat and your back arches during the reach, bring your attention to the ribs. Let them settle toward the mat as you reach through your fingers, keeping the position of the trunk in the movement.
- 17
- Breathe out through your mouth as your arms return to your sides. Follow their travel back to the starting position while noticing whether the contact beneath your ribs changes with the return.
- 18
- Prepare for Knee Fold by keeping your feet down and bending your knees so that each thigh and lower leg form approximately a right angle. Place your hands on your pelvis to follow its position during the leg movement.
- 19
- Exhale as you bring the working knee over its hip, with the thigh coming approximately upright above the mat. Keep the bend in the knee as the leg rises, so that the lift comes from moving the thigh.
- 20
- Feel beneath your palms during the lift. Notice whether the pelvis stays in its starting position or moves with the leg, using the motion beneath your hands as the check.
- 21
- Inhale as you lower the leg until the toes meet the mat. Keep the knee bend unchanged through the descent, following the thigh back down without turning the movement into a reach of the lower leg.
- 22
- After five repetitions of Knee Fold on the working side, set the whole foot on the mat before switching legs. Use the full foot contact as the transition between sides, returning your attention to the position of your pelvis before the next lift.
- 23
- On the other side, follow the same path from the knee above the hip to the toes returning to the mat. Compare the movement you feel under your hands during the lift with the position you feel as the toes land.
- 24
- Finish with your feet resting fully on the mat. Let your hands check the pelvis at rest, ready to change from keeping it still to moving it deliberately in the next exercise.
Set 3 of 6
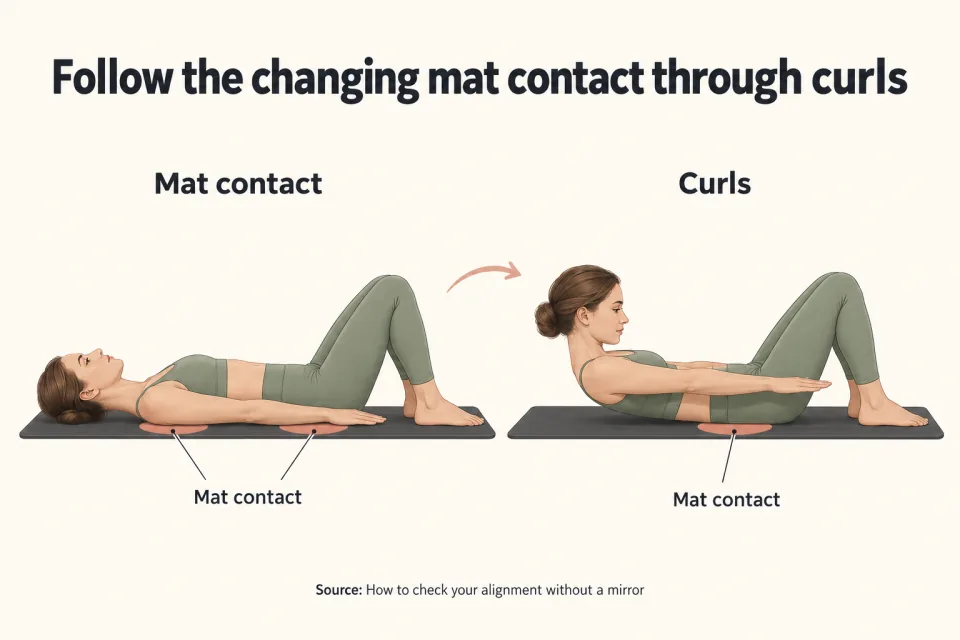
Follow the changing mat contact through curls
- 25
- In Pelvic Curl, follow the order in which your pelvis and back leave the mat. Start with your pelvis neutral, your knees bent and your arms beside your trunk, with palms facing down.
- 26
- Exhale and draw your abdomen inward as you begin lifting the pelvis. Continue through the lower back, middle back and upper back, following the gradual loss of mat contact as the curl travels upward.
- 27
- Inhale at the top of the curl and arrange your shoulders, pelvis and knees along a diagonal line. Use this pause to attend to the position you have reached before beginning the return.
- 28
- Exhale as you bring your back down gradually. Follow the sequence of contact returning to the mat, allowing the lowering to unfold through the spine.
- 29
- Settle your pelvis back into neutral at the end of the descent. Notice the small space beneath your lower back again, distinguishing this resting position from the contact you followed during the curl.
- 30
- For Ab Prep, interlace your fingers behind your head and let your elbows point outward. Keep your hands in that supporting position as you prepare to move the head and upper trunk.
- 31
- Incline your chin slightly toward your chest to begin. Keep this as a small movement of the head before continuing into the upward curl.
- 32
- Exhale as you curl upward until your shoulder blades leave the mat. Feel the back of your waist meet the mat during the lift, letting that contact be part of this exercise's position.
- 33
- Pause in the raised position for an inhalation. Attend to the contact at the back of your waist while your shoulder blades remain lifted, keeping the pause distinct from the lowering that follows.
- 34
- Exhale and lower your trunk and head gradually. Follow the returning contact beneath your upper back, allowing the head to come down as part of the controlled return.
- 35
- Choose the contact check that belongs to the exercise you are making. In the neutral setup for Knee Fold, leave the natural lower-back space; during the upward phase of Ab Prep, allow the back of the waist to meet the mat. Follow this change when moving between a neutral setup and a curl, using the intended position to decide what contact to look for.
Set 4 of 6
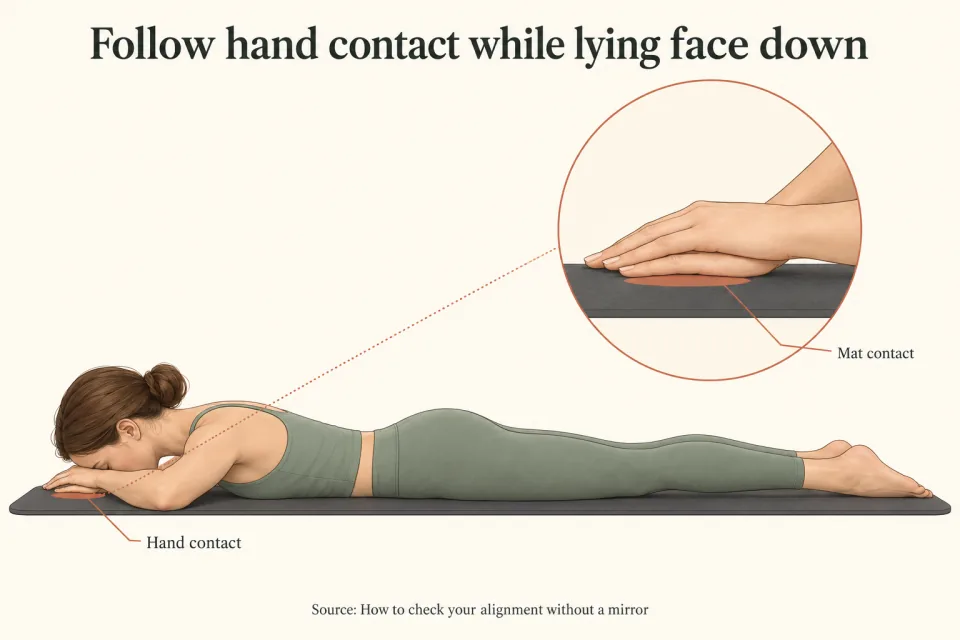
Follow hand contact while lying face down
- 36
- For Breast Stroke Prep, lie face down with your forehead resting on the mat. Settle into this starting position before arranging the legs and arms for the lift.
- 37
- Bring your legs together and point your feet gently. Keep this arrangement as the reference for the lower body while the head and trunk move through the exercise.
- 38
- Straighten your elbows and place your palms against the outer sides of your thighs. Notice where your hands meet your legs, giving your attention to that contact before lifting.
- 39
- Exhale as you raise your head and the upper and middle parts of your trunk. Keep your palms against your thighs throughout the movement, following the lift while maintaining the contact at your sides.
- 40
- Leave your legs in their starting arrangement during the lift. Notice whether they remain together with the feet gently pointed as your trunk moves, using the lower-body position as a separate check from the movement above it.
- 41
- Inhale as you slowly lower your trunk and head. Return your forehead to the mat while keeping the position of the legs and the contact of the arms, completing the movement in its original arrangement.
Set 5 of 6
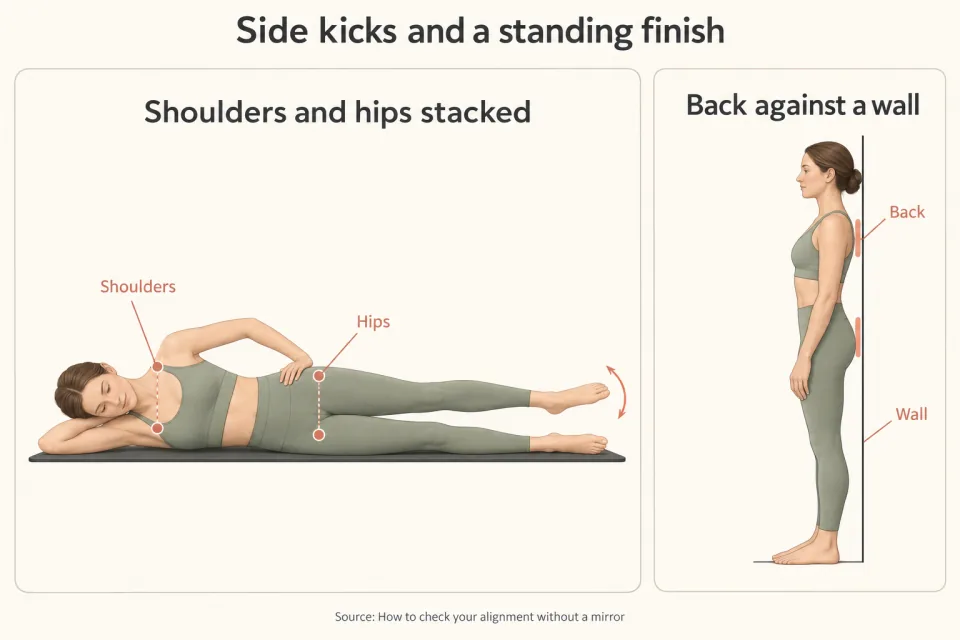
Keep your shoulders and hips stacked during side kicks
- 42
- For Front & Back Side Kick, lie on your side along the back edge of the mat. Lengthen through your spine as you arrange your trunk against that reference line.
- 43
- Bring your legs forward toward the front edge of the mat. Leave your trunk in its original alignment while changing the position of the legs, establishing the shape from which the kick will begin.
- 44
- Arrange your shoulders directly above each other and do the same with your hips. Rest your upper hand on your pelvis to notice its position, combining the stacked setup with the hand contact used earlier in the class.
- 45
- Raise the upper heel to the height of your hip. Begin the forward and backward movement from there, with attention to the height of the leg as well as its direction of travel.
- 46
- Make two forward kicks with the upper foot flexed. Keep the shoulders and hips stacked while the leg moves in front, using the contact of your hand to notice whether the pelvis turns with it.
- 47
- Point the foot as you take the leg backward. Follow the backward reach while keeping your trunk in the starting arrangement, noticing whether your pelvis turns as the leg travels behind you.
- 48
- Shorten the forward or backward movement if a larger kick changes the stacked position. For example, if your upper hip rolls forward as the foot travels forward, choose a smaller forward range that keeps the hip above the lower hip.
- 49
- Use your usual breath through the kicks if that suits the movement. Follow the same position checks without adding a separate breathing pattern to remember.
- 50
- For the demonstrated breathing pattern, inhale as the leg moves forward and exhale as it travels backward. Coordinate the breath with those directions while keeping your attention on the position of your shoulders and pelvis.
- 51
- Change sides and establish the setup again before kicking. Align your trunk along the back edge, move the legs forward and find the stack of shoulders and hips, checking the arrangement on this side before lifting the upper heel.
Set 6 of 6
Close by following your back against a wall
- 52
- Finish with Wall Roll Down, using the wall as the surface you follow through the movement. Come to standing with your back against it, then step your feet a short distance forward while keeping body contact.
- 53
- Use a slight bend in your knees as the offered variation. Arrange that bend while standing against the wall, before you begin following the movement of your spine.
- 54
- Nod your head to start the descent. Let the head movement begin the roll, keeping your attention on where your back is still touching the wall.
- 55
- Exhale as you gradually peel your spine away from the wall. Follow the changing contact along your back, letting the movement travel down the spine while your hips remain against the wall.
- 56
- End the downward movement before your hips leave the wall. Use the remaining hip contact to decide the depth of the roll, keeping your attention there as the upper body moves away.
- 57
- Move slowly enough to notice the order in which your back leaves the wall. Give each change in contact time to register instead of moving directly from standing into the lowest part of the roll.
- 58
- Use the lower abdominals to begin rolling upward. Replace your spine progressively against the wall, following the return of contact as you come upright.
- 59
- Attend to the returning contact as you build the movement up through your back. Let the wall mark the sequence of the movement, just as the mat marked the sequence during Pelvic Curl.
- 60
- Finish standing against the wall with your feet still forward. Notice where your back and hips meet the surface now that the roll is complete, ending the class with attention to your resting position.
Reading list
- Tactile Cueing in Pilates: Three Touchless Strategies to Achieve Similar Outcomes
- How to Find Neutral Spine Position
- How to Do Rib Cage Breathing in Pilates
- How to Do Rib Cage Arms in Pilates
- Knee Fold | A Digital Textbook for Pilates
- Pelvic Curl | A Digital Textbook for Pilates
- Ab Prep | A Digital Textbook for Pilates
- Breast Stroke Prep | A Digital Textbook for Pilates
- How to Do a Front & Back Side Kick in Pilates
- How to Do a Wall Roll Down in Pilates
From the studio's plan file
- Plan credited to
- UniPilates, with no writer named
- What backs it
- 10 sources in the reading list