
Automated checks This plan went on the timetable after its content and sources passed the studio's automated checks on Wednesday 28 October 2026. Before you start
From the studio's plan file
- Plan credited to
- UniPilates, with no writer named
- What backs it
- 6 sources in the reading list
Running order
Set 1 of 6
Warm up with supported rolling
- 01
- Focus this class on how the ladder barrel's curve meets the body, and compare that contact with familiar mat cues for reaching and rolling. The class order is an editorial arrangement of mat preparations and instructor-led apparatus examples.
- 02
- Begin with the supported rolling preparation that Marimba Gold-Watts teaches on the mat. Sit with your knees bent and place your hands behind your thighs, keeping that hand contact as you begin the movement.
- 03
- Exhale into the roll back. Follow Gold-Watts's order through the pelvis, lower back and middle back, letting the movement develop along that route rather than sending the whole torso backward in an unchanged shape.
- 04
- Keep the roll partial while your hands support the movement. Attend to the relationship between your hands and thighs: this is the contact used in the preparation, before the later version changes the role of the arms.
- 05
- When following Gold-Watts's version with the hands released, send your fingertips forward as you roll backward. Give the forward reach as much attention as the backward movement, so the cue has a direction at each end.
- 06
- Use your familiarity with Roll Up to read this preparation. Sabrina Ellen Svard makes that connection when explaining Short Box Round Back: the recognizable feature is the rounding action, even though the apparatus example places the body in a different setting.
- 07
- Compare that rolling action with the lowering phase of the mat bridge. Follow Gold-Watts's image of a pearl necklace settling onto the mat, attending to the order of contact as the spine comes down.
- 08
- Keep your attention on the sequence within the movement. The fingertips reaching forward belong to the rolling preparation; the necklace image belongs to the bridge, where the instruction concerns the order in which the back meets the mat.
- 09
- Carry those separate observations into the apparatus demonstration. Ask your instructor to identify when the torso is rounding in sequence and when it is travelling as a longer shape, so you can compare the action itself without relying only on the exercise name.
Set 2 of 6
Study curved contact and the reaching cue
- 10
- Bring the opposing reach from mat Swan into your observation of Swan Dive on the ladder barrel. In Gold-Watts's mat version, the toes reach away from the crown of the head, giving the lengthening instruction clear directions.
- 11
- Follow that cue in your mat Swan preparation. Think about where the toes are reaching and where the crown is reaching, keeping the instruction tied to those landmarks instead of interpreting length as a request for a larger shape.
- 12
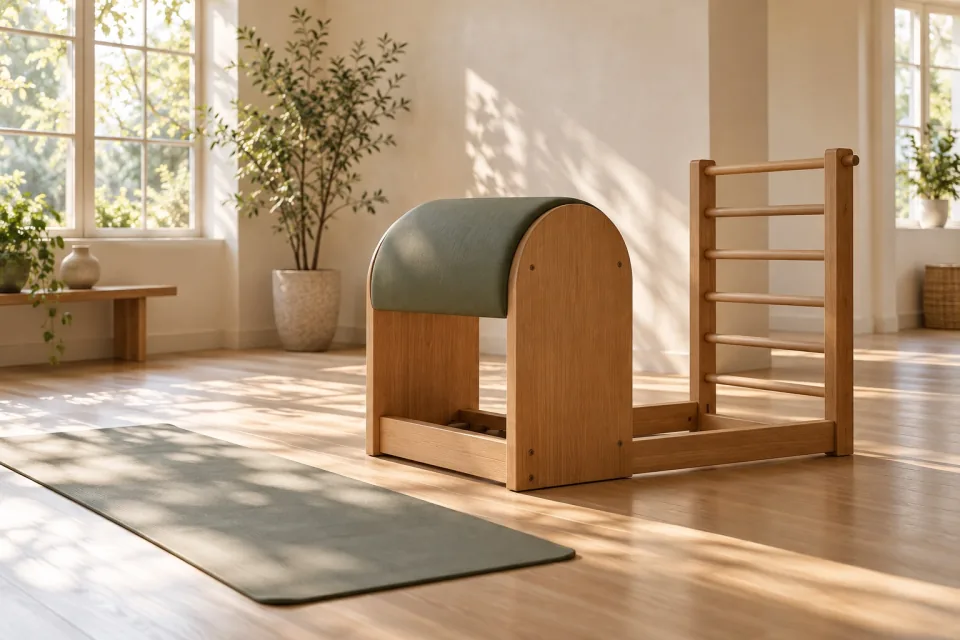
- Turn your attention to the apparatus before the instructor demonstrates. Studio Challenger describes a padded, rounded working surface joined to a ladder with horizontal bars; notice the curved surface and the ladder as distinct places for contact.
- 13
- Look at the ladder's available heights during the instructor's setup. Studio Challenger explains that the rung options accommodate differences in body proportions, so observe the chosen contact in relation to the person demonstrating rather than memorizing a rung as the exercise itself.
- 14
- Watch the instructor demonstrate Swan Dive with attention to the point where the body meets the barrel. Compare the visible relationship between torso and curve with the reaching directions you used in mat Swan, without assuming that the mat and barrel versions have identical positioning.
- 15
- Attend to the instructor's hand cue during the demonstration. Pilates Marbella describes hand placement in Swan Dive as a way of communicating the requested movement; notice where the hand is placed and which direction the teacher asks the student to follow.
- 16
- Separate that hand cue from the apparatus contact as you watch. The hand belongs to the teacher's guidance, while the padded curve is the surface around which the demonstrated movement takes place; identify each contact before interpreting the overall shape.
- 17
- Follow the lengthening instruction through the demonstration rather than judging the exercise only by how far the body bends. Pilates Marbella's teaching overview pairs an increased stretch with keeping the spine from collapsing, which gives a specific point to discuss with the instructor.
- 18
- Return to the language of your mat cue when describing what you observed. Name the reach of the toes and crown, then describe the barrel contact separately; this keeps direction, support and the size of the bend from becoming interchangeable descriptions.
Set 3 of 6
Follow rounding, support and the return to sitting
- 19
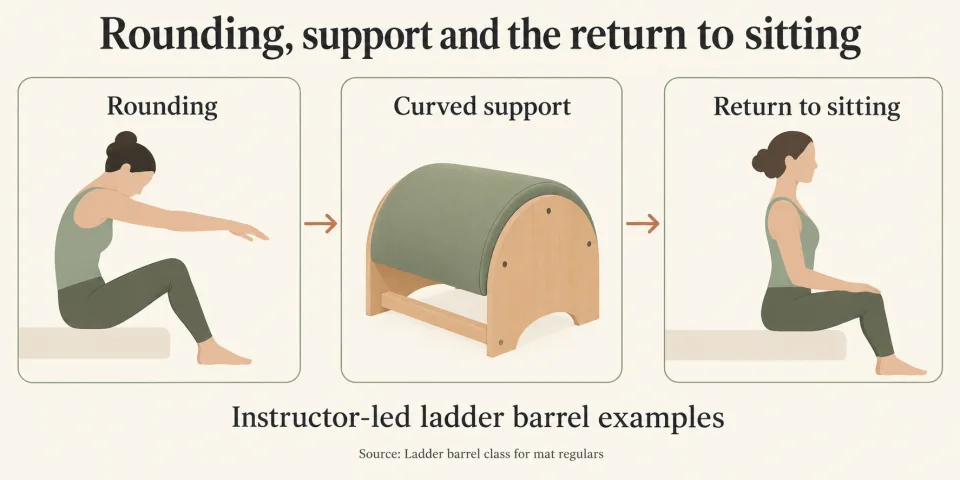
- Watch Short Box Round Back as a sequence of changing contacts, beginning with the seat and feet. Brett Miller starts his variation just forward of the barrel's highest point, with the feet contacting the ladder and the head above an elongated spine.
- 20
- Identify that starting position before following the backward movement. Notice where the seat rests in relation to the top of the curve, and distinguish the initial upright arrangement from the rounded and extended shapes that appear later.
- 21
- Recall the order of your mat rolling preparation while watching Round Back. Svard connects the exercise with Roll Up, so use the familiar rounding action as a point of comparison while attending to the different support supplied by the barrel and ladder.
- 22
- Let the instructor present the balance phase and the change in foot contact as separate parts of Miller's example. His sequence includes balancing before the feet move beneath the upper rung; watch the transition instead of reading the final position as the whole exercise.
- 23
- Follow the long-line position with your eyes along the body. Miller opens the arms to the sides and keeps the body on an angle to the floor, so describe that diagonal as shown rather than substituting a horizontal shape.
- 24
- Compare the long line with the rounding that preceded it. In the rounded phase, your attention follows the changing shape of the torso; in the long-line position, attend to the body's overall angle and the sideways reach of the arms.
- 25
- Watch the return from the backbend in its stated order. Miller brings the arms forward before the head follows, with the torso returning afterward; let each part of that instruction remain visible rather than compressing it into a general cue to sit up.
- 26
- Follow the finishing change at the ladder. Miller moves the feet to a lower rung before folding forward, so include that alteration in your reading of the sequence instead of treating the feet as fixed throughout.
- 27
- Observe the return from the forward fold to upright sitting. Compare its sequential character with the mat rolling and bridge cues from the warm-up, while keeping the different starting positions clear.
- 28
- Discuss the support in the example by naming where it occurs. Studio Challenger describes its ladder barrel Short Box work as an advanced version with less support around the body than the Reformer version.
- 29
- Keep the teaching progression gradual. Sabrina Ellen Svard recommends introducing the Short Box Series gradually while checking the student's understanding of its movement ideas. Use the instructor's discussion to distinguish rounding, holding a long line and returning in sequence before combining them into your account of the exercise.
Set 4 of 6
Keep the seat grounded during a diagonal reach
- 30
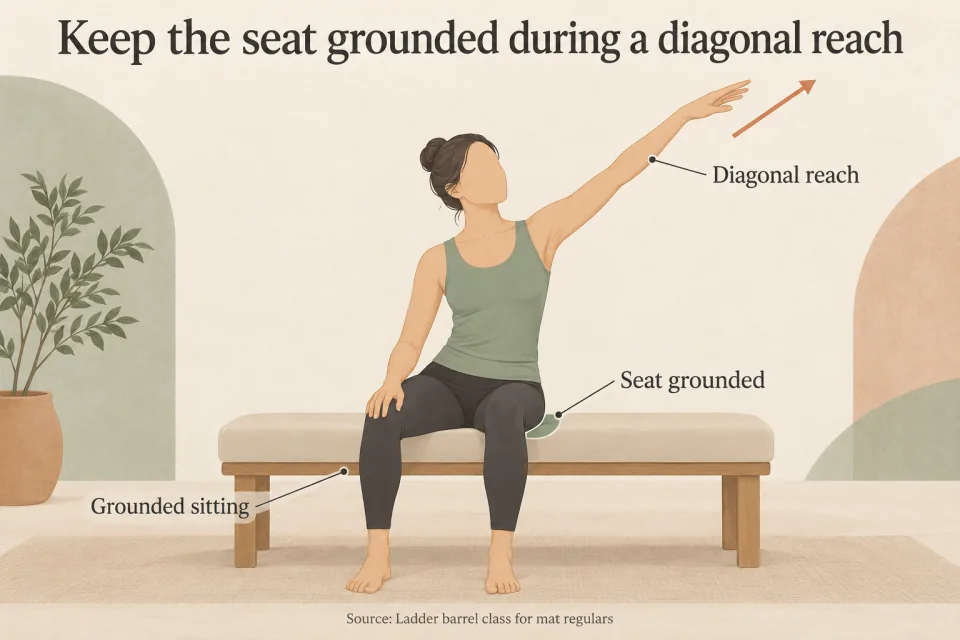
- Begin the Short Box Side-to-Side example by distinguishing a diagonal reach from a side bend. In Svard's ladder barrel teaching, the seat remains grounded while the torso reaches forward on a diagonal, with length maintained along the sides.
- 31
- Watch the seat as the instructor demonstrates the reach. Keep your attention there long enough to identify the anchored part of the example, then follow the direction of the torso without assuming that the pelvis should travel with it.
- 32
- Trace the diagonal forward through the upper body. The instruction combines a direction of travel with a grounded seat; describe those elements together so that a sideways destination does not erase the forward component of the reach.
- 33
- Attend to the length along the sides of the torso. In this version, that cue belongs to the diagonal lean, so watch the overall torso shape as well as the distance travelled away from upright sitting.
- 34
- Ask the instructor to show Svard's standing comparison. Her example uses contact at the pelvic crest while the student reaches diagonally upward, making the distinction between the pelvis and the moving torso available in a different position.
- 35
- Compare the standing and seated examples through the teacher's cue. In standing, identify the hand contact at the pelvis; on the barrel, identify the grounded seat, then follow the reach requested in each example.
- 36
- Watch the added lateral bend as a further variation. Svard introduces that action after establishing the anchored pelvis and lifted torso, so identify the added curve instead of describing every Side-to-Side movement as the same bend.
- 37
- Compare the leg arrangement when the instructor introduces Side Sit Ups. Studio Challenger describes the legs as establishing the base for that exercise; direct your attention to that base before following the torso's movement.
- 38
- Observe the foot-placement alternatives described by Pilates Marbella. Its overview contrasts feet placed on the bottom rails with feet hooked onto the ladder, so name the arrangement being shown instead of assuming that all Side Sit Ups use an identical contact.
- 39
- Keep the exercise names attached to their examples when discussing the set. Use Short Box Side-to-Side for the diagonal-reach comparison and Side Sit Ups for the leg-base comparison; that distinction preserves what each demonstration was intended to show.
Set 5 of 6
Observe turning toward and over the curve
- 40
- Follow Miller's twisting side-bend variation by tracking the shoulders in relation to the ladder and barrel. Begin your observation with the hips facing forward, a foot on a rung and the opposite leg crossed in front.
- 41
- Notice the opening arm position before the turn begins. Miller extends the arms sideways at shoulder height, giving you a visible starting arrangement to compare with the later movement of the shoulders and torso.
- 42
- Watch the upward length through the torso before the turn toward the ladder. Miller places that reaching instruction ahead of the rotation, so keep the preparation and the turn distinct as you follow the demonstration.
- 43
- Follow the shoulders toward alignment with the ladder. Describe the direction using the apparatus itself: the ladder is the reference in this part of the example, while the initial forward-facing hip position remains part of the setup you are observing.
- 44
- Attend to the return to the starting position. Miller comes back between the rotations, so watch that return as its own movement rather than treating the example as a continuous sweep from side to side.
- 45
- Now follow the rotation over the barrel. In this direction, Miller combines turning with bending across the support and rounding the torso along its curve; notice how those actions appear together in the demonstrated shape.
- 46
- Compare the relationship to the apparatus in each direction. The turn toward the ladder uses the shoulders' alignment as a reference, while the turn over the barrel includes a torso shape that follows the padded curve.
- 47
- Recall the Side-to-Side distinction while observing this rounded position. A diagonal lean with long sides and a turn combined with rounding are different instructions, even when the same apparatus appears beneath the student.
- 48
- Use the instructor's demonstration to name the change you see: shoulders turning toward the ladder, a return to the start, or torso rounding over the barrel. Keep those descriptions specific, so the word lengthening does not stand in for every action in the sequence.
Set 6 of 6
Close with seated rotation and alignment
- 49
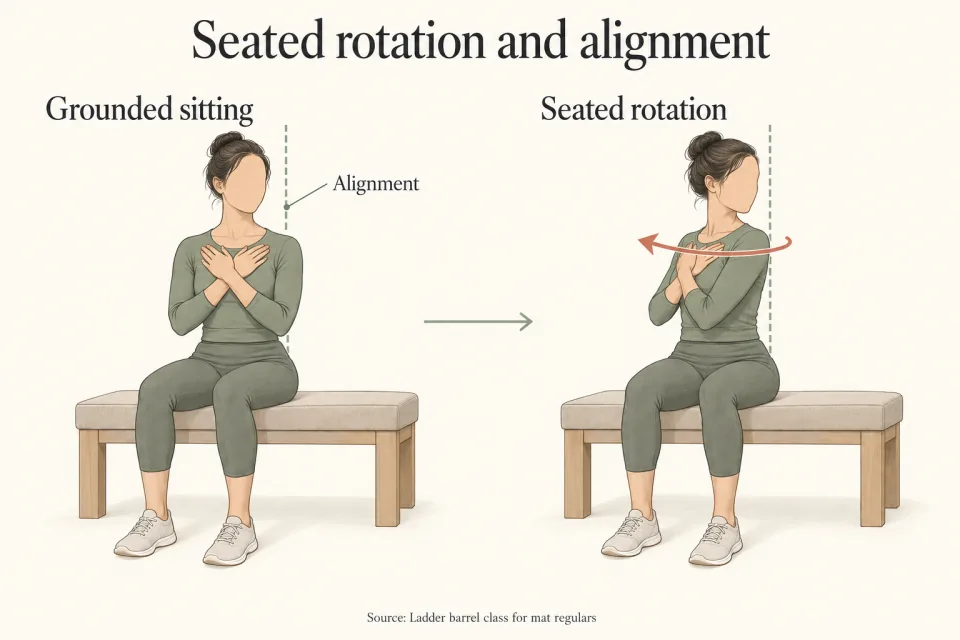
- Close on the mat with the seated rotation and Mermaid work described by Gold-Watts. For the seated twist, place your attention on the torso stacked above the seat and follow her image of growing taller within that arrangement.
- 50
- Turn from that seated organization. Keep the cue tied to the relationship between torso and seat, recalling the grounded sitting position from Side-to-Side without importing the barrel's diagonal-forward instruction into this different movement.
- 51
- Follow Gold-Watts's Mermaid rotations as the closing movement. Let the instructor lead the version being taught, and identify the turning action by following the torso through the movement rather than adding the crossed-leg setup from Miller's apparatus example.
- 52
- Attend to the mat contact during the rotation. Compare it with the specific contacts you observed at the barrel: the seat during Short Box work and the torso following the padded curve during Miller's twisting variation.
- 53
- Return to the seated alignment used in Gold-Watts's close. Arrange the head over the shoulders, with the rib cage and pelvis beneath, following the teacher's cue through those landmarks.
- 54
- Keep that final sitting position distinct from the forward fold in Miller's Round Back finish. The barrel example passes through a fold and an articulated return; this closing cue concerns the arrangement once you are seated upright.
- 55
- Finish with your attention on the stacked position. Let the head, shoulders, rib cage and pelvis remain the landmarks for the close, leaving the diagonal reach and rounded barrel shape with the exercises in which they were taught.